MSTR Instruction Guide
Instruction Guides
Discover our instruction guides for all watch models.
For additional information or further questions, contact info@meisterwatches.com


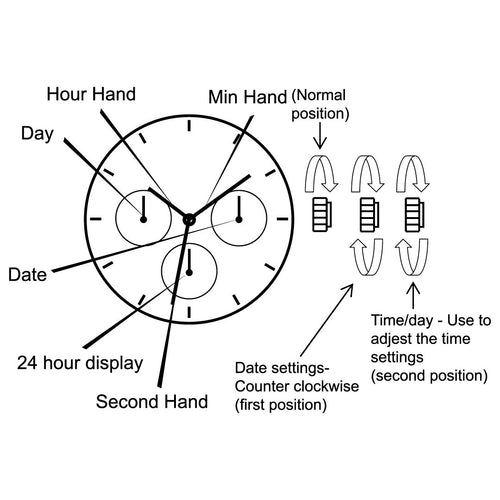
Chronograph Model
1.SETTING THE TIME
*Please make sure you have correctly set the am/pm before you
start to adjust the time.
- Pull the crown out to the 2nd position when the second hand
points to 0 (12 o’clock)
- After setting the time, use a time signal to schronize the watch by
pushing the crown to the normal position to the start the second hand
going.
- You can not quickly adjust the day of the week.
In order to adjust the day, you must advance the hour hand by 24
hours per day.
2. SETTING THE DATE
*Pull the crown out to the first position.
- Turn the crown to the left to set the date.
You can adjust the date between approximately 9pm and 0:30am.
- After setting the time/date/day of the week, please push the
crown back to its normal position.
3. USING THE TIMER
- Press top pusher to start/stop timer.
- Press bottom pusher to split/reset timer.
4. ADJUSTING THE STOPWATCH HAND POSITION
- Pull out the crown to the second click
- Press button (A) or (B) to reset the stopwatch second and
minute hands to “0” postion.
*By pressing button (A), the hands move counter clockwise.
*By pressing button (B), the hands move clockwise.
- Push the crown back to the normal position.

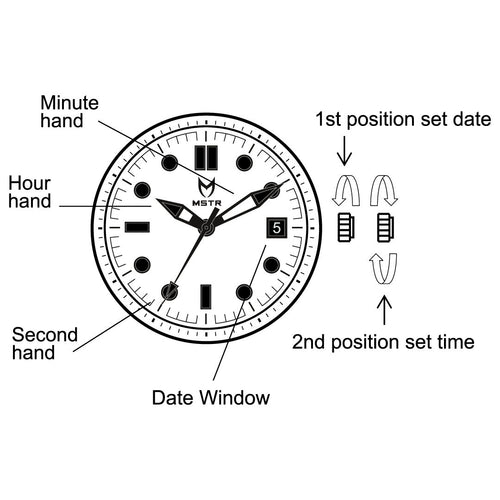
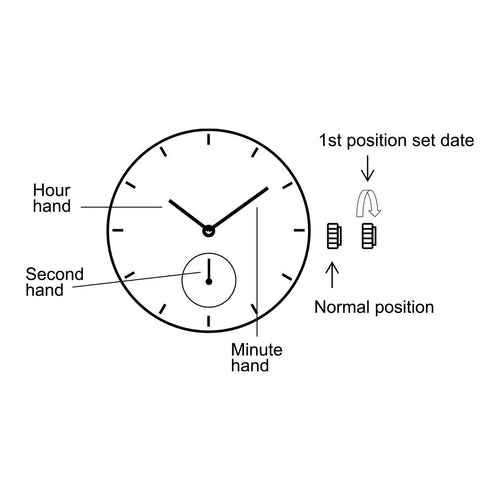
3 Hand Model
1.SETTING THE TIME
- Pull the crown out to the 2nd position when the second hand points to O (12 o'clock)
- After setting the time, use a time signal to synchronize the watch by pushing the crown to the normal position to the start the second hand going.
2. SETTING THE DATE
*Pull the crown out to the first position.
- Turn the crown to the left to set the date. (Spin the crown towards you)
- After setting the time/date/day of the week, please push the crown back to its normal position.
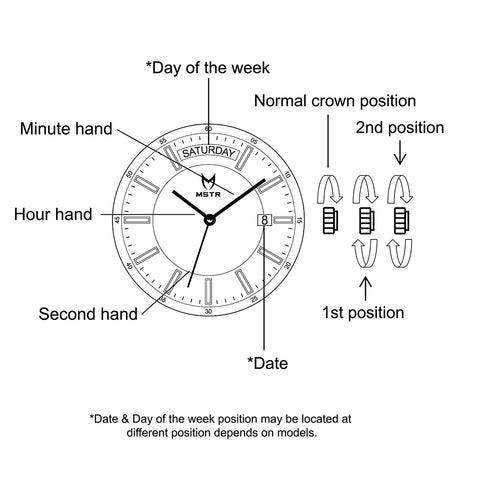
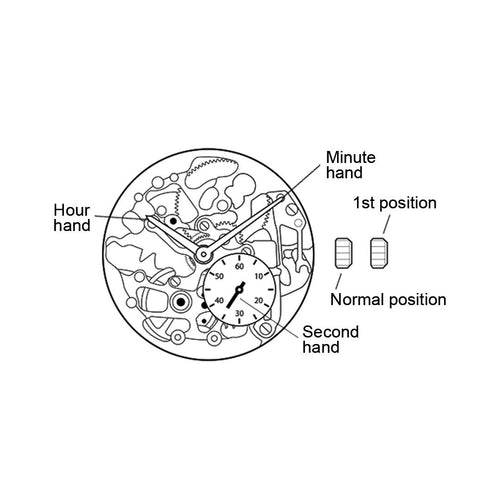
Three Hand Day/Date
1.SETTING THE TIME
- Pull the crown out to the 2nd position.
- Turn the crown to set hour and minute hands.3. When the crown is pushed back to the normal position, second hand begins to run.
2. SETTING THE DATE
- Pull the crown out to the 1st position.
- Turn the crown counter-clockwise to set the date.* If the date is set between the hours of around 9:00 PM and 1:00 AM, the date may the date may not change on the following day.
- After the date has been set, push the crown back to the normal position.
3. SETTING THE DATE OF THE WEEK
- Pull the crown out to the 1st position.
- Turn the crown counter-clockwise to set the date.* If the date is set between the hours of around 9:00 PM and 1:00 AM, the date may the date may not change on the following day.
- After the date has been set, push the crown back to the normal position.
Multifunction Model
1. SETTING THE TIME
*Please make sure you have correctly set am/pm before you
start to adjust the time.
- Pull the crown out to the 2nd position when the second hand
points to 0 (12 o’clock)
- After setting the time, use a time signal to synchronize the watch by
pushing the crown to the normal position to start the second hand
going.
- You can not quickly adjust the day of the week.
In order to adjust the day, you must advance the hour hand by 24
hours per day.
2. SETTING THE DATE
*Pull the crown out to the first position.
- Turn the crown to the left to set the date.
You can adjust the date between approximately 9pm and 0:30am.
- After setting the time/date/day of the week, please push the
crown back to its normal position.
Automatic 8N40
(1) WINDING THE MAINSPRING
Automatic winding watch can also be hand winded by turning
the crown clockwise in Normal position. Wind several times
clockwise. It will start to move manually.
(2) SETTING THE TIME
1. Pull the crown out to the 1st Click Position.
2. Turn the crown to set hour and minute hands.
3. After the time has been set, push the crown back to normal position.
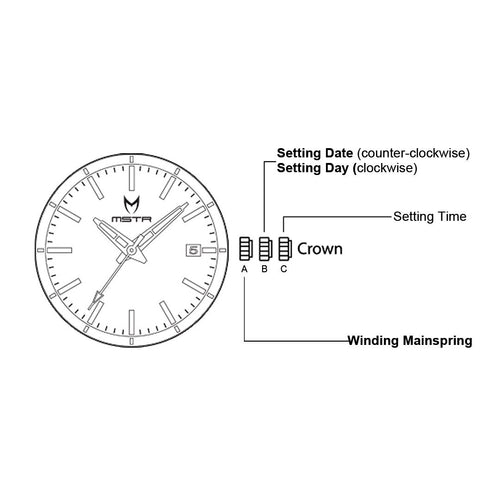
Automatic 821A
SETTING THE TIME
(1) Winding the Mainspring
Automatic winding watch can also be hand winded by turning
the crown in “A” position. Wind 15 - 20 times clockwise.
(2) SETTING THE DATE
1. Pull the crown to “B” position.
2. Turn the crown counter-clockwise to set the date.
*If the date is set between the hours of around 9:00 PM and
1:00 AM, the date may not change on the following day.
3. After the date has been set, push the crown back to the
normal position.
3) SETTING THE TIME
1. Pull the crown to “C” position.
2. Turn the crown to the set the hour and minute hands.
Ultraslim 1L45
(1) SETTING THE TIME
1. Pull the crown to the 1st Click Position
2. Turn the crown to set hour and minute hands
3. After the time has been set, push the crown back to normal position.
Chronograph Model
1.SETTING THE TIME
*Please make sure you have correctly set the am/pm before you
start to adjust the time.
- Pull the crown out to the 2nd position when the second hand
points to 0 (12 o’clock)
- After setting the time, use a time signal to schronize the watch by
pushing the crown to the normal position to the start the second hand
going.
- You can not quickly adjust the day of the week.
In order to adjust the day, you must advance the hour hand by 24
hours per day.
2. SETTING THE DATE
*Pull the crown out to the first position.
- Turn the crown to the left to set the date.
You can adjust the date between approximately 9pm and 0:30am.
- After setting the time/date/day of the week, please push the
crown back to its normal position.
3. USING THE TIMER
- Press top pusher to start/stop timer.
- Press bottom pusher to split/reset timer.
4. ADJUSTING THE STOPWATCH HAND POSITION
- Pull out the crown to the second click
- Press button (A) or (B) to reset the stopwatch second and
minute hands to “0” postion.
*By pressing button (A), the hands move counter clockwise.
*By pressing button (B), the hands move clockwise.
- Push the crown back to the normal position.
